Bluetooth
Note: before interacting with a bluetooth controller, it is advised to update the Linux Bluetooth stack bluez5 to the latest version for the best performance and stability. The version used when writing this documentation was bluez 5.79. Some of the console snippets could differ when using another bluez5 version.
Bluetooth with the integrated WILC chip
Initialize the device
We initially encountered some problems to get bluetooth up and running. We found an issue in the Avnet Ultra-PYNQ GitHub repository where a similar problem was described and were able to use the proposed solution to get bluetooth to work. We took the following shell script from the mentioned GitHub URL to achieve this:
#!/bin/bash
echo BT_POWER_UP > /dev/wilc_bt
echo BT_DOWNLOAD_FW > /dev/wilc_bt

stty -F /dev/ttyPS1 115200
sleep 1s

hciattach /dev/ttyPS1 -t 10 any 115200 noflow nosleep
sleep 2s
hciconfig hci0 up
hciconfig hci0
We added a few more delays in the script so the WILC3000 chip has time to start up. Without this delays, the chip would return error codes indicating it could not start successfully. After executing this script, the firmware is downloaded and a new hci device (the bluetooth controller) is up and running.
A major disadvantage to this is that the script must be executed every time the system boots in order to interact with the integrated bluetooth chip.
Interacting with the controller
After the firmware is downloaded and loaded, the bluetoothd-process in Linux is automatically started. This means we can open a bluetooth command prompt with the bluetoothctl command and check the current state of the controller we just initialized:
blendinator:~$ bluetoothctl
hci0 new_settings: powered bondable le secure-conn
[bluetooth]# Agent registered
[bluetooth]# [CHG] Controller F8:F0:05:C3:34:27 Pairable: yes
[bluetooth]#
This shows that a bluetooth controller with MAC-address F8:F0:05:C3:34:27 is found and the controller is in the pairable state. The bluetooth command prompt will be used later on in this documentation.
Notes about the WILC chip
In our project, we will not use the integrated ATWILC3000 chip for Bluetooth connections. The chip supports Bluetooth 5.0, but only the Low Energy (LE)-variant. This means that audio streaming with the A2DP protocol is not supported since it is one of the features of native Bluetooth.1
However, this controller could still be used for other types of connections. This includes MIDI over Bluetooth, controling the mixer via Bluetooth, and so on.
Bluetooth with the TP-Link UB500
Installing the firmware
To support audio streaming via Bluetooth to the Ultra96-V2, we will use the TP-Link UB500 Bluetooth USB dongle which contains a Realtek rtl8761bu chipset. When inserting the dongle in the board it is immediately recognized by the system via the lsusb command, but the neccessary firmware is not yet installed. The firmware files for the rtl8761bu chipset can be found on the internet or on every Linux distribution with kernel 5.8+. We uploaded the neccessary firmware files to the GitLab repository of this project.
To install the firmware, the two .bin firmware files need to be copied to /lib/firmware/rtl_bt/. The firmware will be loaded whenever the USB dongle is inserted.
If the installation was succesful, a new hci device on the USB bus should appear in hciconfig:
blendinator:~$ hciconfig
hci0:   Type: Primary  Bus: USB
    BD Address: E8:48:B8:C8:20:00  ACL MTU: 1021:6  SCO MTU: 255:12
    UP RUNNING PSCAN ISCAN
    RX bytes:4611 acl:0 sco:0 events:346 errors:0
    TX bytes:26607 acl:0 sco:0 commands:330 errors:0
The advantage of this dongle is that the firmware only needed to be downloaded and installed once. Once the files are installed, the device will automatically be initialized on startup.
Notes about the TP-Link UB500
When we reverted the PetaLinux project to version 2023.2, the Linux kernel version also downgraded to version 6.1 instead of version 6.6. It came to our attention that loading the firmware at boot for the TP-Link UB500 will always fail with error code -2 (file not found) for now. A temporary workaround is just plugging the USB dongle in when the system is fully started.
The Bluetooth console
Now that the firmware is installed, we can open a Bluetooth console to interact with the TP-Link UB500 Bluetooth dongle. We can see some information about the current controller with the show command:
[bluetooth]# show
Controller E8:48:B8:C8:20:00 (public)
    Manufacturer: 0x0002 (2)
    Version: 0x0b (11)
    Name: blendinator
    Alias: blendinator
    Class: 0x007c010c (8126732)
    Powered: yes
    PowerState: on
    Discoverable: no
    DiscoverableTimeout: 0x000000b4 (180)
    Pairable: yes
    UUID: A/V Remote Control        (0000110e-0000-1000-8000-00805f9b34fb)
    UUID: OBEX Object Push          (00001105-0000-1000-8000-00805f9b34fb)
    UUID: PnP Information           (00001200-0000-1000-8000-00805f9b34fb)
    UUID: A/V Remote Control Target (0000110c-0000-1000-8000-00805f9b34fb)
    UUID: Generic Attribute Profile (00001801-0000-1000-8000-00805f9b34fb)
    UUID: Audio Sink                (0000110b-0000-1000-8000-00805f9b34fb)
    UUID: Device Information        (0000180a-0000-1000-8000-00805f9b34fb)
    UUID: Generic Access Profile    (00001800-0000-1000-8000-00805f9b34fb)
    UUID: Handsfree Audio Gateway   (0000111f-0000-1000-8000-00805f9b34fb)
    UUID: Handsfree                 (0000111e-0000-1000-8000-00805f9b34fb)
    Modalias: usb:v1D6Bp0246d054F
    Discovering: no
    Roles: central
    Roles: peripheral
Advertising Features:
    ActiveInstances: 0x00 (0)
    SupportedInstances: 0x0c (12)
    SupportedIncludes: tx-power
    SupportedIncludes: appearance
    SupportedIncludes: local-name
    SupportedSecondaryChannels: 1M
    SupportedSecondaryChannels: 2M
    SupportedCapabilities.MinTxPower: 0xffffffde (-34)
    SupportedCapabilities.MaxTxPower: 0x0007 (7)
    SupportedCapabilities.MaxAdvLen: 0xfb (251)
    SupportedCapabilities.MaxScnRspLen: 0xfb (251)
    SupportedFeatures: CanSetTxPower
    SupportedFeatures: HardwareOffload
The most interesting here is the "Audio Sink" UUID. This shows that our system can act as an audio sink to other Bluetooth devices. It is important to note that this UUID will only be visible when an audio application on the system registers some MediaEndpoints with Bluez. More information about this below.
In order to pair and connect with a device, some commands need to be executed in the bluetooth console. Later on this will be handled by the Qt GUI, but the process will be showed here as background information.
- First, we need to make the controller discoverable for other devices nearby. This can be done with the
discoverable oncommand:
[bluetooth]# discoverable on
[bluetooth]# hci0 new_settings: powered connectable bondable ssp br/edr le secure-conn wide-band-speech
[bluetooth]# hci0 new_settings: powered connectable discoverable bondable ssp br/edr le secure-conn wide-band-speech
[bluetooth]# Changing discoverable on succeeded
[bluetooth]# [CHG] Controller E8:48:B8:C8:20:00 Discoverable: yes
- After this, we can scan for nearby devices to pair and connect with.
[bluetooth]# scan on
[bluetooth]# SetDiscoveryFilter success
[bluetooth]# Discovery started
[bluetooth]# [CHG] Controller E8:48:B8:C8:20:00 Discovering: yes
[bluetooth]# [NEW] Device B2:5C:DA:FA:97:9F B2-5C-DA-FA-97-9F
- The last line in the console shows that a new device with MAC address B2:5C:DA:FA:97:9F has been found. To pair and connect with the device, use the
connectcommand:
- Depending on the type of device we are connecting to, we may need to enter or confirm a passphrase. When the connection is established, the bluetooth label in the console will change to the UUID of the device. We can use the
infocommand to gather some information about the connected device:
[B2-5C-DA-FA-97-9F]# info
Device B2:5C:DA:FA:97:9F (public)
    Name: soundcore Liberty 4 NC
    Alias: soundcore Liberty 4 NC
    Class: 0x00240404 (2360324)
    Icon: audio-headset
    Paired: yes
    Bonded: yes
    Trusted: yes
    Blocked: no
    Connected: yes
    LegacyPairing: no
    UUID: SDP                       (00000001-0000-1000-8000-00805f9b34fb)
    UUID: Serial Port               (00001101-0000-1000-8000-00805f9b34fb)
    UUID: Headset                   (00001108-0000-1000-8000-00805f9b34fb)
    UUID: Audio Sink                (0000110b-0000-1000-8000-00805f9b34fb)
    UUID: A/V Remote Control Target (0000110c-0000-1000-8000-00805f9b34fb)
    UUID: Advanced Audio Distribu.. (0000110d-0000-1000-8000-00805f9b34fb)
    UUID: A/V Remote Control        (0000110e-0000-1000-8000-00805f9b34fb)
    UUID: A/V Remote Control Cont.. (0000110f-0000-1000-8000-00805f9b34fb)
    UUID: Handsfree                 (0000111e-0000-1000-8000-00805f9b34fb)
    UUID: Generic Audio             (00001203-0000-1000-8000-00805f9b34fb)
    UUID: Vendor specific           (0cf12d31-fac3-4553-bd80-d6832e7b3947)
    UUID: Vendor specific           (66666666-6666-6666-6666-666666666666)
    UUID: Vendor specific           (df21fe2c-2515-4fdb-8886-f12c4d67927c)
    Battery Percentage: 0x5a (90)
- Last but not least, it is a good practice to trust the device so that it can connect to the blendinator even when the bluetooth console isn't active. This can be done with the
trustcommand:
[B2-5C-DA-FA-97-9F]# trust B2:5C:DA:FA:97:9F
[B2-5C-DA-FA-97-9F]# [CHG] Device B2:5C:DA:FA:97:9F Trusted: yes
[B2-5C-DA-FA-97-9F]# Changing B2:5C:DA:FA:97:9F trust succeeded
The bluetooth console offers an extensive amount of features. Above, the basics were explained to connect to a device. We will not use the bluetooth console further in this project.
Bluetooth Audio Interfaces
PipeWire and Wireplumber as Bluetooth Audio Sink
By default, the embedded system created with PetaLinux will use PulseAudio as its audio server. To provide better Bluetooth Audio stability and performance, we tried to use the newer PipeWire and Wireplumber packages. We executed the following steps:
- First, we needed to disable some modules in the config files of pipewire and wireplumber. When changes are made to the default configuration of PipeWire, it is required to copy the configuration files from
/usr/share/pipewire/to/etc/pipewire/:
blendinator:~$ cd /etc
blendinator:/etc$ sudo mkdir pipewire
blendinator:/etc$ sudo cp /usr/share/pipewire/pipewire.conf /etc/pipewire/
blendinator:/etc$ sudo cp /usr/share/pipewire/pipewire-pulse.conf /etc/pipewire/
-
After this, we needed to disable the modules
libpipewire-module-portal,libpipewire-module-jackdbus-detectandlibpipewire-module-rtsince they are required for the PipeWire GUI portal and will prevent PipeWire from starting up since there is no GUI at this moment. The modules can be disabled by commenting out the lines of each module in/etc/pipewire/pipewire.conf: -
Lastly, we need to enable and start the PipeWire and Wireplumber processes:
blendinator:~$ sudo systemctl enable pipewire
blendinator:~$ sudo systemctl enable wireplumber
blendinator:~$ systemctl --user enable pipewire-pulse
blendinator:~$ sudo systemctl start pipewire
blendinator:~$ sudo systemctl start wireplumber
blendinator:~$ systemctl --user start pipewire-pulse
From now on, the PipeWire and Wireplumber processes are started automatically each time the system boots. We can see the current audio server configuration of the system and verify that PipeWire is working with the pactl info command:
blendinator:~$ pactl info
Server String: /run/user/1000/pulse/native
Library Protocol Version: 35
Server Protocol Version: 35
Is Local: yes
Client Index: 54
Tile Size: 65472
User Name: petalinux
Host Name: u96v2-sbc-base-2023-2
Server Name: PulseAudio (on PipeWire 1.2.6)
Server Version: 15.0.0
Default Sample Specification: float32le 2ch 48000Hz
Default Channel Map: front-left,front-right
Default Sink: alsa_output.platform-fd4a0000.display_zynqmp-dp-snd-card.stereo-fallback
Default Source: alsa_output.platform-fd4a0000.display_zynqmp-dp-snd-card.stereo-fallback.monitor
Cookie: f432:aa01
This shows that the current audio server on the system is managed by PipeWire. It is important to note that when installing PipeWire and Wireplumber within PetaLinux, it is configured to be executed systemwide. This means that the processes need to run as root instead of one of the system users, so that wireplumber will start up the profile main-systemwide. This enables PipeWire and Wireplumber to keep running, even when no user is logged in, which is of great importance in our system. The pipewire-pulse process will however run in user mode, because PulseAudio also runs in user mode.
Notes about PipeWire and Wireplumber
It is important to note that PipeWire and Wireplumber are audio servers. This means that they can manage all audiostreams on the system, including the ones from Bluetooth. Initially, we chose for PipeWire and Wireplumber to enable support for Bluetooth Audio on the system because Wireplumber already contains the neccessary A2DP decoder libraries and features to support Bluetooth Audio.
However, when using PipeWire as audio server, we noticed that the DBus communication between PipeWire/Wireplumber and Bluez couldn't take place. We saw the following messages with journalctl -xe:
wireplumber[773]: wp-internal-comp-loader: Loading profile 'main-systemwide'
wireplumber[773]: listen(): Address already in use
wireplumber[773]: RegisterProfile() failed: org.bluez.Error.NotPermitted
This was problematic since Wireplumber couldn't inform bluez about its audio source or sink support so whenever a device is connected over Bluetooth, media streaming would be blocked. After a long search, the issue seem to be with the package ofono which is enabled and running by default on the system. Ofono seems to interfere with some features of Wireplumber so that it couldn't register any A2DP profile with Bluez.
Even though we could disable ofono and try Wireplumber again, we decided to continue the project with another package that acts as middleware between an audio application and a Bluetooth device. PipeWire and Wireplumber are audio servers that have a vast amount of features which are not needed for the project and increase the load on the system. It turns out that bluez-alsa is a better fit for our project and will enable us to have even more control over the Bluetooth Audio interface we're going to implement.
BlueZ-ALSA as Bluetooth Audio Sink
BlueZ-ALSA (also known as BlueALSA) is a rebirth of the direct integration of BlueZ and ALSA, which has been removed since bluez5 in favor of 3rd party applications like PipeWire. BlueALSA provides very detailed documentation, from the build of the application to the configuration of the A2DP profiles. The documentation can be found in the GitHub repository.
The full context of BlueALSA is well summarized in the diagram below coming from the repository:
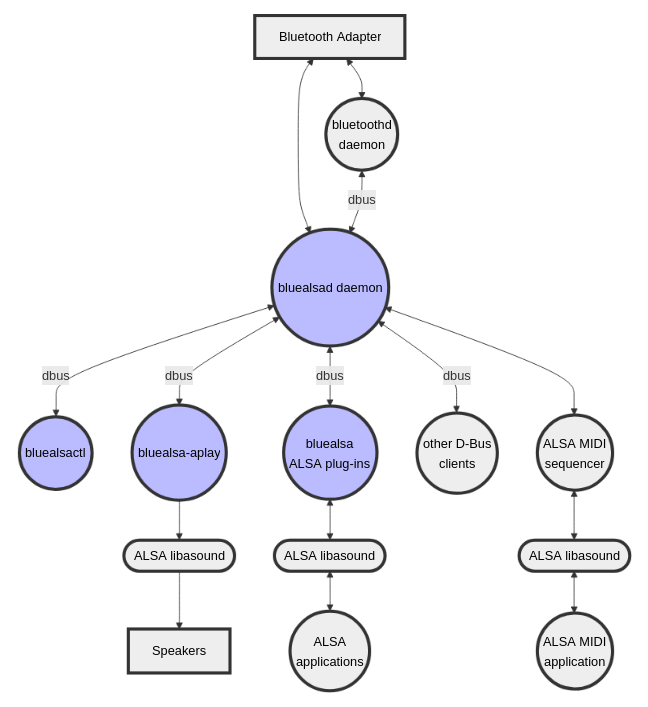
We can see that almost all communication will go over dbus. DBus is a message bus system used by many applications. The BlueALSA daemon is the central point of BlueALSA's operation. In our project, we will primarily use bluealsactl, the bluealsa ALSA plug-ins and bluealsa-aplay.
First, we will do a quick check with BlueALSA to check which A2DP profiles, also known as Bluetooth codecs, are supported. Each profile/codec will be registered with the Bluetooth agent as a MediaEndpoint. To check which profiles are currently supported, we run the bluealsa-cli status command:
In our project we will mainly use the aptX-HD codec. Officially, this codec supports 24-bit 48kHz audio, but the reverse-engineered implentation (libfreeaptx) of the codec used in the project will only go up to 44.1 kHz. As the virtual soundcard we will create later on will only support 24-bit 48kHz, we will need to do some resampling in between the aptx decode library (libfreeaptx) and the ALSA soundcard.
There are many different ways to handle this difference in sample rate. We could just resample the audio in the custom kernel driver created later on, but it's a good practice to handle such a resource intensive task in userspace rather than in the kernel. In addition, there already exist some pretty good resamplers in userspace so this saves time on research to create such a resampler.
If we then perform the resampling in userspace there are still multiple choices. We could use the high-quality resampler from an audioserver like PulseAudio to resample the audio from Bluetooth and create a loopback to our virtual soundcard. It turns out that the audio servers present on our system miss some important modules to handle the resampling. For example, PulseAudio was missing module-loopback and module-resampling.
There is however also another approach we could use. ALSA provides the possibility to resample audio between applications if we tell it to with the alsa-plugins package. For this, we need to edit the system's sound configuration in /etc/asound.conf and define a plug or rate around our virtual soundcard. This would then look like this:
The virtual soundcard we created (see alsa-axi-dma documentation) is CARD #2 DEVICE #0, identified in the configuration as hw:2,0. It turns out that with this configuration, audio coming from Bluetooth and routed to the default soundcard with bluealsa-aplay isn't resampled to 48kHz which will result in the soundcard denying the audio stream because of the wrong sample rate. Changing plug to rate and specifying speexrate_best as converter didn't make a difference.
In a normal Linux environment, the above approaches would be the best and most stable methods to handle resampling. However, in our created linux distribution there must have been a conflict somewhere which made the above approaches impossible in that state. Due to lack of time we did not spend further research time in the above approaches, but introduced a workaround. It is important to note that while this workaround did work, it is not recommended in a final product.
ALSA contains some utils that, when concatenated, can indirectly handle resampling. The audio stream coming from bluetooth can already be recorded with arecord in 24-bit 48kHz and then piped to aplay which sends the audio finely to our virtual soundcard in the appropriate format. This leads to the following command which, when executed, will record all audio from Bluetooth in the right format and send it to our virtual soundcard:
arecord -D bluealsa:DEV=48:74:12:55:D6:CC,PROFILE=a2dp -f S24_LE -r 48000 -c 2 | aplay -D hw:2,0 -f S24_LE -r 48000 -c 2
The key points we identify in this command are the source and sink devices that audio comes from and is sent to, as well as defining the sample format and sample rate. We can see that the source device is bluealsa:DEV=48:74:12:55:D6:CC,PROFILE=a2dp and the sink device is again hw:2,0. It is important to mention that BlueALSA creates a PCM source device by default whenever a device is connected via Bluetooth. The device identifier contains the MAC address of the connected device, which means that when the Bluetooth device is disconnected, the audio stream to hw:2,0 will also stop to exist.
BlueALSA contains a tremendous amount of features. With this project we only explored part of it, but we found it very pleasant to work with this middleware. More information about BlueALSA's capabilities can be found on the wiki mentioned above.
-
When writing this documentation, the latest variant of bluetooth is Bluetooth 5.4. It is worth mentioning that from Bluetooth 5.2 onwards, audio streaming is supported in Bluetooth Low Energy. The feature is called "LE Audio" and uses the LC3 codec for streaming audio. This codec is very promising as it has a good trade-off between bandwidth and quality, such that no existing software codec such as LDAC can match it. Another nice feature of LE Audio is "Auracast": it is from now on possible to stream to an unlimited number of audio sinks with LE Audio. More information about LE Audio could be found on the Official Bluetooth website. In this project we will stick with Bluetooth 5.0 and native Bluetooth Audio because the LE Audio variant is not yet widely used and supported. ↩